Saturday, December 25, 2010

Atari Tempest Mini

Got my Tempest mini going before I left for Xmas vacation. I got the cabinet from a collector near Greenville SC. It is running a Dell M992 computer monitor at 1024x768 resolution. Looks really good... yeah I know, it's notta vector monitor, but it is a blast to play.


The CP overlay cleaned up nicely. I just sliced the tattered overlay at the bend where it meets the glass, then scrapped the adhesive off the metal. I will leave it like this for now until I feel like replacing the CPO entirely.


Friday, December 17, 2010

MONSTER MAME Control Panel

Got my Monster MAME control panel done. Now I can do some 2 player Smash TV / Total Carnage action!!!


Monday, November 22, 2010

Walk Through Video 11/21/2010

Got a new Canon Power Shot S95 so here is a mandatory walk through with all the games turned on. Enjoy.

Thursday, November 18, 2010

Arturo's Arcade Lab - Home of SPACE PARANOIDS


We finally have a working prototype.


The trigger fires, and either top button centers the tank. 2-1/4" trackball on the left works like a mouse, I will probably reverse the Y-axis, which I think is more intuitive for aiming. Player 1 and 2 buttons, plus Continue and New Game buttons on the right.


Old Defender cabinet was a Mortal Kombat conversion when I got it. I will try a few other cabinets styles in the future. This one will be running at my TRON after-party in December.

UPDATE:
I was able to get the Space Paranoids game to reside on the hard drive so this machine no longer needs internet access to be playable.

Wednesday, November 17, 2010

Bubble Bobble in a Williams cabinet


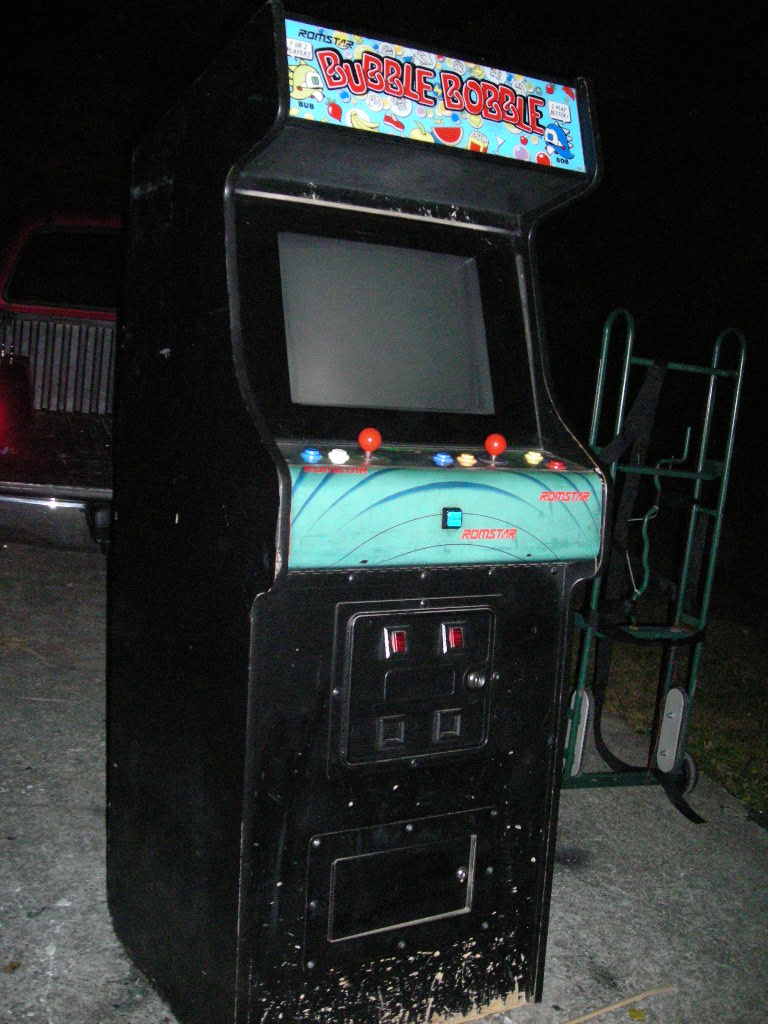
I extracted this non-working Bubble Bobble from a daycare facility as part of a trade for a working game. Upon closer inspection, the cabinet seems to be an alternate style Robotron. I can see the outline of the Robotron sideart under the black latex paint.


It's been a while since this poor sod has been cleaned and vacuumed.


NASTY!!!


Monitor still works, and is in very decent shape. I cleaned the dirt off the screen and the image is clear and bright, very moderate burn-in.


Well I measured the voltages, and strangely, it measures +12Vdc where the supply is labeled +5Vdc. And I measured +5Vdc where it says +12Vdc. I get nothing on -5Vdc.

I swap out the power supply with a good one, connect the rails, and the thing comes to life. Board is good, monitor is good, working game!!!

So what now??? Well, I am planning to do a Robotron, or MultiWilliams out of the cabinet. It is rare to find an alternate Robotron cabinet, so this thing will not stay a Bubble Bobble for very long. The BB guts will go on Ebay or in a generic cabinet.

Friday, November 5, 2010

Ten - Hut!!!

I picked up this working Bally Midway Sarge less than 2 miles from my house. Don't think I ever played it in the arcade, but I do have a faint memory of the on-screen action. Takes a couple of games to get used to controlling the tank but once you do it is a blast to play.


The CP is pretty clean, and one side is mostly intact, the other side is torn up. Anyway, for the price, it was nice to get a rare game so close by.

Monday, September 6, 2010

Discs of Tron Environmental (Chopped)


The DOT E (Chopped) cleans up nicely with new baby blue T-molding.

The old T-molding was brittle and cracking. The machine had nicotine residue all over. I cleaned that up with some LA's Totally Awesome.

Wednesday, August 25, 2010

Nintendo PimpChoice10

I was able to get my pimp-hands on a ghetto-licious Playchoice 10 cabinet. It was empty, dirty, and had mo holes in the control panel than a $5 ho at a crackheads convention.

So I decided to pimp-MAME this muther out!!!


Yo, it gots chrome T-molding, and a 3" Trackball!!! It gots 2 joysticks and 6 buttons each fo puttin' da pimp-slap on all my Mortal Kombat bitchez...

Friday, August 20, 2010

Computer Monitor to Arcade Monitor Frame Transplant

Check it out. I took a Dell M992 computer monitor and transplanted it to a standard arcade monitor frame from an Electrohome GO7-CBO.


We start by decasing the Dell M992 computer monitor.


Once the yoke, wires, and chassis are exposed, it's a good idea to disconnect the grounds, degauss coil, V and H, and the remote PCB.

I went ahead and bolted the top tube ears. This will hold the monitor at the proper level for the next step, which is bolting the bottom ears using an adapter.


I found a flat piece of metal with holes the right distance apart.


Since the 19" computer monitor tube is a little smaller than the arcade monitor tube, we have to make adapters to mount the monitor "ears" onto the Electrohome GO7-CBO frame. I used a flat metal bracket with the holes about 3/4" apart for the bottom ears. For the top ears I used left-over coin door latches with holes drilled in them.


I had to push the chassis forward as far as I could, then zip tie it in place using convenient holes and tabs.


Here I am testing it to make sure all that handling did not damage the monitor.

Here it is mounted inside a Tempest mini.


Friday, June 4, 2010

Discs of Tron w Switcher.MOV

GREETINGS PROGRAM!!!

DOT... RESURECTED!!!

Kozmic Krooz'r Operational

I got this Kozmic Krooz'r a year or two ago in Savannah GA. The boardset had been taken out for safekeeping since the cabinet was falling apart. It was also missing the monitor. The fellow who sold it to me also sold me a fully working Wacko with a brand new Happ Vision Pro. I thought it would be cool to have a Wacko and a Kozmic Krooz'r. And what luck to find them both in one lot, and for a terrific price.

I took the Wacko back home immediately and proceded to replace the bottom. Both cabinets had been in a flood so the bottoms were deteriorating. The Kozmic Krooz'r eventually sat in my Mom's storage place for a year or two. I finally took it back home and mended the bottom, put the boardset back in, installed a Happ Vision Pro.

Powered the Krooz'r up and the background colors changed randomly, which I suspected was not normal. Also, the colors on the letters looked funny.

http://www.youtube.com/watch?v=o5iBTnfOsPo

I installed an Arcadeshop MCRII switching power supply kit and here is video of that. The background colors only change when the level is finished now. The video looks a bit more stable too.

http://www.youtube.com/watch?v=KT3LbQWZ9IE


Tuesday, May 25, 2010

Ms Pacman Rescue

Rescued these two ladies from a laundrymat in South Atlanta.


The person who had them told me that one quit working, so the owner bought another Ms Pac for parts to repair the old one.


After about a minute or so, I diagnosed that the old one was in test mode and plays blind.


The second one, well, all it needed was a fuse... literally... here's my fix. Temporarily, of course:


Saturday, April 3, 2010

Strippin'

Seems like I have been stripping a lot of Romstar stuff lately...


Sunday, February 28, 2010

DK-Regulus-Galaga

I got this cabinet as a trade. It was a DK, then a Regulus, then a Galaga... with an inkjet marquee...


Poor cabinet has had a rough life:


Bezel turned inside-out. Control panel molested several times...


Spray painted black, and white iron-on edging glued on.


Inkjet Galaga marquee... with electrical tape...


Sir Hacks-a-Lot spares no boardsets...


Not even monitor frames...


This story does have a happy ending though. Here is the cabinet after I rehabilitated it:


Re-painted cabinet with correct Nintendo T-molding.


New control panel, overlay, and instruction card.


Virgin Asahi-Seiko coin mechs.


Donkey Kong Lives!!!


Space Invaders Multi

2/6/2010... I think...
Got my Space Invaders back from Melinda's. The cabinet is in really good shape.


I went ahead and replaced the ailing fluorescent fixture with an under-the-cabinet fixture and put the blacklight bulb back in. Looks awesome.

Testing Power Supplies...

I got this Topower Zumax power supply at Microcenter. I usually run a burn-in test on new power supplies.

First I have to jumper pin 13 and 14 using the paper clip trick so that it will turn on when it is plugged in. I load one of the molex connectors with an old hard drive. Once it has run for a few hours, I clip and crimp the wires for pins 13 and 14.


Then I attach some right angle brackets for mounting into the cabinet.


I just use 1/2" hex screws and 51 cent brackets. I don't drill all the way through, just a little divot, and then power in the hex screw right in.

.